Author: thehomemakersdream@gmail.com

  • Fun & Easy Purim Crafts for Toddlers – Simple DIY Ideas!

    Purim is a time of joy, celebration, and creativity! For toddlers, hands-on crafts are the perfect way to engage with the holiday while developing fine motor skills. Whether you’re looking for simple projects for a classroom, a playgroup, or a fun afternoon at home, these Purim crafts for toddlers are easy, mess-free, and full of excitement. Plus, I’ve rounded up my favorite craft supplies and kits from my Amazon storefrontso you can get everything you need in one place!

    1. DIY Gragger (Noisemaker)

    No Purim celebration is complete without a gragger! Toddlers will love shaking their own homemade noisemakers while listening to the Megillah.
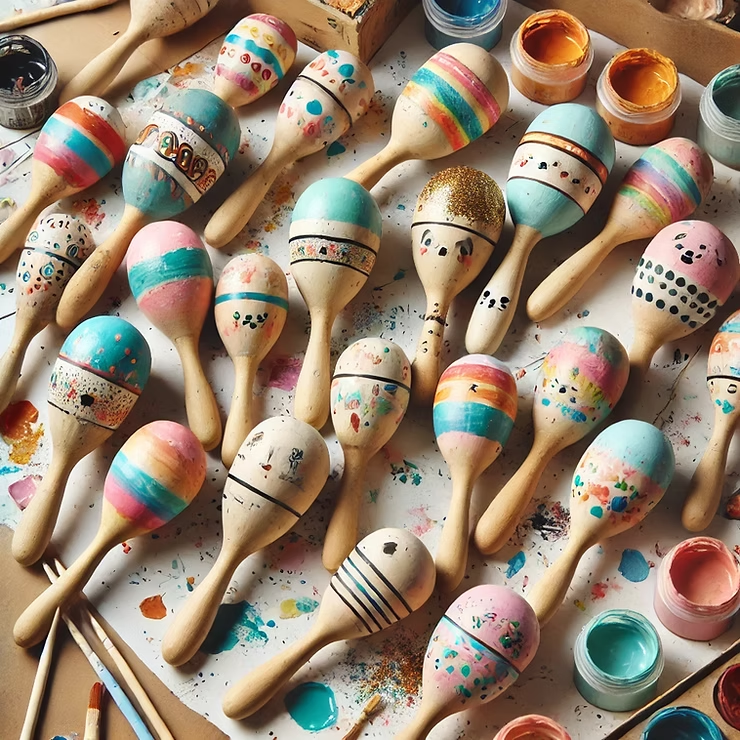
    Colorful painted maracas arranged on a paint-splattered surface, surrounded by open jars of vibrant paint, creating a lively, artistic mood.

    What You’ll Need:

    • Mini Wooden Maracas
    • Washable Paint

    👉 Grab the craft supplies here: Amazon Storefront

    2. Purim Crowns for Royal Playtime

    Craft supplies featuring black paper crowns with colorful gems and gold accents, surrounded by scissors, and beads on a tan background.

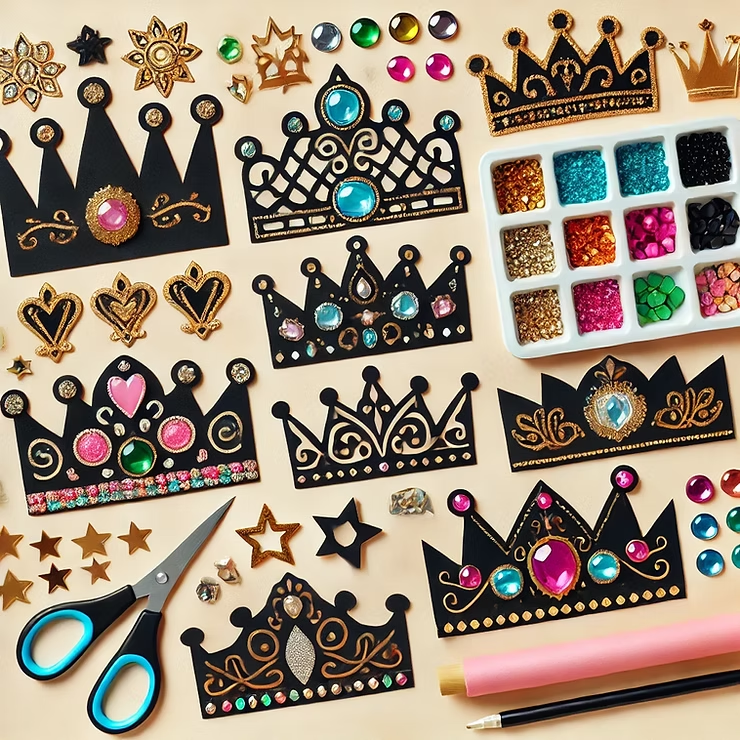
    Every child deserves to feel like royalty on Purim! These easy DIY crowns make toddlers feel like Queen Esther or King Achashverosh in an instant

    What You’ll Need:

    • DIY Scratch Paper Crowns with Colorful Gem Jewels Stickers

    👉 Find the craft supplies here: Amazon Storefront

    Purim is all about fun, laughter, and creativity! These easy Purim crafts for toddlers will keep little hands busy and make the holiday even more special. Ready to get started? Visit my Amazon storefrontfor all the supplies you need in one place.

    🎭 Happy Purim and happy crafting! 🎨

    Check it out:

    The Best Acrylic Megilla Holder

  • Creative Parshas Mishpatim Craft: DIY Printable Meat and Dairy Marker Magnets

    Parshas Mishpatim is packed with mitzvos that guide us in living with honesty, fairness, and responsibility. One of the most well-known mitzvos in this parsha is the separation of meat and dairy. 

    This mitzvah is one of the foundations of keeping a kosher home, but let’s be honest—keeping a kosher kitchen organized can be tricky! That’s where this fun Parshas Mishpatim craft comes in.

    These DIY printable meat and dairy marker magnets are an easy and creative way to label your fridge, freezer, or kitchen surfaces so there’s no confusion.

    So grab your supplies, and let’s make these practical kosher kitchen magnets together!

    Kosher kitchen magnet ad with red and blue designs. Text reads "Kosher Kitchen Magnet" and "Free Download" with an arrow on beige backdrop.

    How to Make Your Own Printable Meat and Dairy Marker Magnets

    What You’ll Need:

    • Printable meat and dairy marker templates (Download below!)
    • Cardstock or sticker paper
    • Scissors
    • Laminator (optional, for extra durability)
    • Adhesive magnet sheets OR Double-Sided Tape

    Step-by-Step Instructions:

    1. Print Your LabelsDownload and print your meat and dairy marker designs on cardstock or sticker paper for best results. If using regular paper, laminating them will help them last longer.
    2. Cut Out the MarkersPerfection is overrated. Let kids do it their way and feel proud of their work 😉
    3. Attach to Magnets or use Scotch TapeUsing magnet sheets? Stick your labels onto the sheet, then cut around each design.Using double-sided tape? Stick to the back of each label.
    4. Place on Your Kitchen SurfacesNow for the fun part—stick your finished magnets onto your fridge, freezer, or any magnetic surface. Multiply your options of where to place there by using the double-sided tape hack. Your kosher kitchen is now beautifully labeled!

    Get Your Printable Meat and Dairy Marker Templates!

    Want to make these adorable and practical markers for your kitchen?

    🔗[Download Now]

    Keeping kosher has never been easier—or cuter!

    Why You’ll Love These Meat and Dairy Marker Magnets

    Ties into the Parsha – A hands-on way to reinforce the mitzvah of separating meat and dairy.

    Super Easy to Make – Print, cut, and stick onto magnets—done in minutes!

    Great for Kids – Helps them learn kosher kitchen rules in a fun way.

    Keeps Your Kitchen Organized – No more second-guessing which shelf or dish belongs where.

    In Conclusion,

    These DIY printable meat and dairy marker magnets are a simple way to reinforce the mitzvos of Parshas Mishpatim in a practical, hands-on way. Try them out and let me know how they work for your kitchen!

    Do you use labels or color coding to organize your kosher kitchen? Share your favorite tips in the comments!

  • Creative Parshas Yisro Desserts to Sweeten Your Shabbat Table

    Parshas Yisro is a powerful and monumental parsha, as it includes Matan Torah—the giving of the Torah on Har Sinai! This momentous event is filled with imagery, from the mountain trembling to the Aseres Hadibros (Ten Commandments) being revealed.

    These Parshas Yisro-inspired desserts bring the themes of the parsha to life in a fun, creative, and delicious way.

    1. Har Sinai Mountain Cake

    Make a mini mountain cake represents Har Sinai, where Hashem gave the Torah to Bnei Yisrael.

    Creative Parshas Yisro Desserts to Sweeten Your Shabbat Table Har Sinai Mountain Cake

    What You’ll Need:

    • Cake mix
    • Green frosting
    • Fandant
    • Flower sprinkles (optional)
    • Luchos shaped cookies (optional)

    How to Make It:

    1. Bake a round cake and carve it into a mountain shape.
    2. Frost with green icing to represent grass.
    3. add flowers made of fondant or use ready flower sprinkles
    4. Optional: Place a small edible Luchos decoration at the top!

    This dramatic and delicious cake brings the Matan Torah experience to your Shabbat table!

    2. Torah Scroll Cupcakes

    Make these Torah cupcakes to symbolize the gift of the Torah to Bnei Yisrael.

    Cupcake with white icing and sugar crystals, topped with two rolled white chocolate curls, on a wooden surface. Cozy and inviting.

    What You’ll Need:

    • Vanilla or chocolate cupcakes
    • Buttercream frosting
    • Edible paper or fondant

    How to Make It:

    1. Frost each cupcake with buttercream.
    2. Roll edible paper or fondant into small scrolls.
    3. Use an icing pen to write tiny Hebrew letters on the scroll.
    4. Place the scrolls on top of each cupcake for a Torah-inspired treat!

    Make Parshas Yisro Sweet and Meaningful!

    The giving of the Torah is a special event that deserves a delicious celebration! These Parshas Yisro desserts add fun, creativity, and deeper meaning to your Shabbat table.

    Which one will you try first? Let me know in the comments

  • Creative Parshas Yisro Har Sinai Crafts for Kids Fun and Meaningful DIY Ideas

    Looking for engaging Parshas Yisro craft ideas to bring the story of Matan Torah to life? Whether you’re a teacher, parent, or homeschooler, these creative and hands-on Torah-themed crafts will help children connect with this important parsha in a fun and meaningful way. From Har Sinai crafts to shabbos craft, these activities are designed to be easy, engaging, and perfect for preschoolers and young kids. Keep reading for simple DIY craft ideas that make learning about Parshas Yisro exciting!

    Har Sinai Craft Free Digital Download

    Parsha craft image with Mount Sinai and tablets, vibrant flower cutouts, and coloring pages on wood texture. Text: Download Now. Calm mood.

    This free printable craft is designed for kids of all ages.

    • Older kids color their own flowers to paste on the Har Sinai.
    • Younger children can use the ready colored flowers. Or order these flower stickers. Happy crafting, we hope you enjoy the time spent crafting with your kids.

    Color it Acrylic Hadlokas Neiros Card

    Decorative Hebrew text card with mosaic border, leaning near a glittery silver box with Hebrew text. White background.

    One of the 10 commandments given in this weeks torah portion is the commandment to remember the day of shabbos and to keep it holy. How beautifully appropriate is this gorgous acrylic candle lighting prayer. Color it to your taste, and enjoy it on display.

    *This post contains affiliate links at no extra cost to you. We appreciate you for supporting our work to bring you quality content weekly.

  • Creative Easy DIY Strawberry Costume for Kids

    Creating a DIY strawberry costume for your preschooler is a fun and easy project that requires minimal sewing and basic craft materials. This adorable costume is comfortable, lightweight, and perfect for dress-up, themed parties, or school events.

    Two smiling girls in strawberry costumes with green leaves and black dots. Bright, playful setting with a joyful mood.

    Materials Needed

    • Red Sweatshirt
    • Black felt fabric (for the seeds)
    • Green felt fabric (for the leafy collar and headband)
    • Green headband (or fabric-covered wire)
    • Fabric glue or hot glue gun
    • Scissors
    • Sewing kit (optional)

    Step-by-Step Instructions

    1. Add the Black Seeds

    • Cut small oval shapes from black felt to resemble strawberry seeds.
    • Glue or sew them onto the red sweatshirt, spacing them evenly for a natural look.
    • Tip: Use self-adhesive felt (linked here)

    2. Make the Green Leafy Collar

    • Cut a wavy, star-shaped pattern from the green felt to create the leafy top of the strawberry. The size should be wide enough to drape around the neckline.
    • Attach the leafy collar around the neckline of the tunic using glue or by sewing it in place.

    3. Create the Strawberry Stem Headband

    • Wrap a green headband with matching green felt (if it’s not already green).
    • Cut a small, rolled cone shape from green felt to create a short strawberry stem.
    • Attach the stem to the headband using hot glue.
    Hands cut black felt circles with scissors; strawberries and green felt leaf on pastel background. Strawberry pattern accents.

    Final Touches

    Wear the costume over a plain red or black outfit for a complete look. This DIY strawberry costume is soft, comfortable, and easy to move in—perfect for preschoolers!

    Shop the Supplies: Find all the materials for this project in my Amazon Storefront! I’ve linked my favorite felt fabric, glue, and craft tools to make your DIY project even easier.

    (All links are affiliate links at no extra cost to you)

  • Creative Arts and Crafts ideas for Parshas Beshalach for Preschool

    Parshas Beshalach contains so many beautiful themes. We feed the birds on this shabbos to show our gratittude to the little birds for eating up all of the Manna that was spread out on Shabbos. I like this craft because it involves the kids in the traditions of the week. I have the most marvelous memory of looking out the window on a cold Beshalach Shabbos and waiting for the birds to come and taste the treats we laid out for them.

    To make crafting easy for you, I gathered all materials you need for this craft into my Amazon Storefront. (Note: I do make a small commision when you purchase using my link. This is one way you can support my work so I can keep bringing these ideas to you weekly.)

    Bird Feeder Craft for Parshas Beshalach and Shabbos Shira:

    This easy bird feeder craft is perfect for little hands and makes a great project for Shabbos Shira!

    Hand holding a decorated cup of birdseed labeled "Shabbos Shira." Colorful bird stickers and blue scissors are on a table in the background.

    Materials Needed:

    • Small paper cup
    • Birdseed
    • Hole punch
    • Yarn or ribbon (about 12 inches long)
    • Markers, stickers, or crayons for decorating
    • Glue (optional for adding extra decorations)

    Instructions:

    1. Decorate the Cup.
      • Using markers, crayons, or stickers.
      • They can draw birds, flowers, or any Shabbos Shira theme.
    2. Punch Holes for the Handle
      • Using a hole punch, make two holes on opposite sides near the rim of the cup.
      • Make sure the holes are big enough for the yarn or ribbon to pass through.
    3. Attach the Handle
      • Thread a piece of yarn or ribbon through both holes.
      • Tie a knot at each end to secure it. This will allow the bird feeder to be hung from a tree branch.
    4. Fill with Birdseed
      • Add a small amount of birdseed into the cup.
    5. Hang and Enjoy!
      • Hang the bird feeder outside on a tree or porch.
      • Watch the birds come and enjoy their special Shabbos Shira treat!
      Let us know if the birds came to visit your feeder.
  • DIY Heart Garland: A Simple and Charming Craft

    A DIY heart garland is the perfect craft! Whether you’re preparing for a special occasion, decorating a classroom, or just looking for a fun weekend project, this garland is simple to make and can be customized to suit any style.

    Paper heart garlands in red, pink, and white hang in soft sunlight. Hearts lie scattered on a wooden table, creating a cozy, romantic mood.

    Materials You’ll Need:

    • Colored or patterned paper (cardstock works best)
    • Scissors
    • Glue or double-sided tape
    • String, twine, or ribbon
    • A hole punch (optional, for threading hearts)

    Step-by-Step Instructions:

    1. Choose Your Color Palette

    Decide on the theme or color scheme for your garland. Soft pastels for a romantic vibe, bright hues for a cheerful look, or even metallics for a modern twist.

    2. Create Heart Templates

    Draw a heart shape on a piece of cardboard to use as a template. Trace the heart onto your chosen paper and cut out as many as you need for your garland.

    3. Add Dimension (Optional)

    To give your garland a 3D effect, fold some hearts in half and glue the folded edges to flat hearts. This adds depth and texture to your design.

    4. Attach Hearts to String

    • Option 1: Use a hole punch to make holes near the top of each heart, then thread them onto your string or ribbon.
    • Option 2: Glue the hearts directly to the string, spacing them evenly.

    5. Hang and Enjoy

    Find the perfect spot for your garland—drape it across a mantel, hang it in a doorway, or string it along a wall.

    Creative Variations:

    Personalized Messages

    Write messages or names on each heart for a personal touch. Perfect for Valentine’s Day or an anniversary celebration.

    Layered Hearts

    Stack smaller hearts on larger ones using contrasting colors or patterns to create a layered effect.

    Materials Beyond Paper

    Try fabric, felt, or even recycled materials like old book pages or magazines for a unique twist.

    Why I Love This Craft

    A DIY heart garland is so versatile! It’s quick to make, uses materials you probably already have, and the results are always beautiful. Plus, it’s an easy craft to do with kids, making it a great family activity.

    To Sum it Up

    A DIY heart garland is a simple yet impactful way to add charm to any space. Whether you go bold with bright colors or keep it subtle with neutrals, this craft is sure to bring a smile to anyone who sees it.

    Have you tried making a heart garland? Share your photos and tips in the comments below!

  • Creative Parshas Bo Treat

    Looking for creative ways to make Parshas Bo memorable? This locust-themed dessert is a perfect way to connect kids to the parsha in a fun and tasty way! With simple ingredients and easy steps, you can create a treat that captures the story’s essence while delighting everyone at the table. Whether you’re planning a special Shabbos activity or just want a unique snack, these Parshas Bo desserts and treats are sure to be a hit!

    Lovely Locust Healthy Treat

    Green apple and pretzel insect with apple wings on a white plate. Surrounded by pretzels and raisins on a wooden surface. Vibrant and playful.

    Materials Needed:

    • Green apple slices (body)
    • Red apple slices (wings)
    • pretzel sticks (legs)
    • raisins (eyes)
    • 1 small dollop of peanut butter or cream cheese (to attach the eyes)

    Steps:

    1. Create the Body and Wings:
      • Slice the apples into thin wedges. Take the slices and arrange them as pictured above.
    2. Attach the Legs:
      • Break the pretzel sticks into smaller pieces and stick them on each side for the locust’s legs.
    3. Add the Eyes:
      • Use a small dab of peanut butter or cream cheese to stick two raisins onto one end of the body as the locust’s eyes.
    4. Optional Decoration:
      • Use small pieces of fruit or colorful sprinkles to decorate the wings for a creative touch.

    Quick Tip:This edible craft is a fun and healthy snack that kids will love making and eating! Perfect for a parsha-themed activity or just a fun food project. 🦗

  • Creative Parshas Bo Craft Ideas for Kids

    Parshas Bo provides a lot of inspiration for craft ideas that connect children to the parsha. These hands-on activities bring the story to life, making it easier for kids to relate to the key themes and lessons of this parsha.

    Here are some Parshas Bo craft ideas that your kids will enjoy creating.

    1. Easy Locust Craft

    Clothespin insect craft with green paper wings, googly eyes, and fuzzy pipe cleaner antennas on a light background. Playful mood.

    Materials linked here

    Materials Needed:

    • Green construction paper
    • Clothespins (wooden or plastic)
    • Pipe cleaners (green or brown)
    • Googly eyes
    • Glue or double-sided tape
    • Scissors
    • Optional: Markers or crayons

    Steps:

    1. Create the Locust Body:
      • Use a clothespin as the locust’s body. Decorate it with markers or crayons, or leave it plain.
    2. Make the Wings:
      • Cut two wing shapes out of green construction paper.
      • Attach the wings to the sides of the clothespin using glue or tape.
    3. Add the Legs and Antennae:
      • Cut three pieces of pipe cleaner for the legs.
      • Glue or tape them to the bottom of the clothespin.
      • Use two smaller pipe cleaner pieces for the antennae and attach them to the top.
    4. Stick on the Eyes:
      • Attach googly eyes to the front of the clothespin to create the locust’s face.
    5. Optional Decoration:
      • Add details to the wings with markers or stickers for extra fun!

    Cute sheep Craft

    Child holding a sheep craft made of cotton balls and paper, on a colorful floral drawing. Scissors and colored felt are nearby. Playful mood.

    Materials linked here

    Materials Needed:

    • Cotton balls
    • Black paper
    • Googly eyes
    • Glue
    • Scissors
    • Popsicle stick (optional)

    Steps:

    1. Cut Shapes:
      • Cut a black sheep head and legs from the black paper.
    2. Make the Body:
      • Glue cotton balls in an oval shape on a plain sheet of paper.
    3. Add the Head and Legs:
      • Glue the black head on top of the cotton ball body.
      • Attach the legs at the bottom.
    4. Stick on Eyes:
      • Glue googly eyes to the head.
    5. Optional Puppet:
      • Attach a popsicle stick to the back for a handle.

    Enjoy your fluffy sheep craft! 🐑

    In Conclusion

    By making these crafts, kids can explore the parsha’s themes while having fun and expressing their creativity.

    Which craft will you try first? Share your creations in the comments!

  • Fun Preschool Craft Ideas for Tu BiShvat

    Tu BiShvat, also known as the “New Year for Trees,” is a wonderful time to celebrate nature, trees, and the environment with your preschoolers. It’s a perfect opportunity to introduce young children to the joys of nature through creative and engaging crafts. Here are some simple and fun Tu BiShvat craft ideas that will help your little ones connect with the season and the beautiful trees around us.

    1. Placemat Craft

    Fun for all ages. 

    1. Download the PDF file.
    2. Let the kids get creative and color the picture.
    3. Laminate this fun fruit themed placemat for maximum functionality,.

    2. Decorate a Tree

    Fun for all ages.

    1. Download the PDF file.
    2. Cut out fruits for younger kids.
    3. Older kids can cut out the fruits on their own.
    4. Use a glue stick to paste the fruits on to the tree.

    Bonus Activity: Print multiple trees and let the kids sort each fruit on to its own tree

    3. Paper Plate Tree

    Hands hold a paper plate with a tree art made of green paper leaves. Scissors and colored paper are nearby on a wooden surface.

    What you’ll need:

    • Paper plates
    • Brown and green markers or crayons
    • Construction paper
    • Glue

    How to make it:

    1. Have your child color the edges of a paper plate with brown or green to represent the tree’s trunk and roots.
    2. Cut out leaves from construction paper and color them green, then glue them onto the tree.
    3. For a fun twist, you can add little fruit shapes or stickers to the tree!

    4. Nature Prints

    Children create leaf prints with paint, hands decorated in green patterns. Bright floral and leaf designs on paper, surrounded by paint pots.

    What you’ll need:

    • Leaves or flowers (real or fake)
    • Paint
    • Paper

    How to make it:

    1. Lay the leaf or flower flat on a piece of paper.
    2. Dab a sponge or brush with paint, and gently press it onto the leaf to create a print.
    3. Carefully remove the leaf or flower to reveal the print left behind.
    4. Let the artwork dry before displaying it.

    This is a great way to help kids appreciate the variety of textures and shapes in nature while creating a stunning piece of art.

    In Conclusion

    Tu BiShvat is the perfect time to introduce preschoolers to the wonders of trees and nature through crafts. Whether they’re making tree collages, painting fruit and seeds, or planting seed paper, these crafts will not only teach them about the importance of nature but also foster creativity and fine motor skills. Have fun celebrating the “New Year for Trees” with these adorable, hands-on activities!

    More to love:

    Purim Crafts for toddlers