In Parshas Vayeira, Avraham welcomes three mysterious guests into his tent, who turn out to be angels sent by Hashem. They bring the news that Avraham and Sarah will soon have a son, Yitzchak.
These activities will help kids connect with the parsha’s themes of kindness, hospitality, and miracles.
This is a great opportunity to talk to your kids about kindness and faith.
Avraham’s tent was open on all sides so he could welcome guests from any direction. This craft helps kids visualize his kindness and hospitality.
Materials Needed: Popsicle sticks, small paper or fabric tent “walls,” markers, and mini people figures or cutouts for the “guests.”
Instructions:
Use popsicle sticks to create the frame of a tent.
Attach paper or fabric around the frame, leaving each side open to symbolize Avraham’s open tent.
Place small figurines or cutouts inside to represent the guests.
Discussion Tip: Talk about ways we can show kindness to others, just like Avraham did.
Craft Idea #2: “Angel Wings” Headbands
The three visitors who come to Avraham’s tent are angels, and this simple craft lets kids imagine themselves as messengers of kindness.
Materials Needed: White construction paper, glitter, glue, headband base.
Instructions:
Cut out large wing shapes from construction paper and decorate them with glitter.
Attach the wings to a headband so kids can “wear” their angel wings.
Discussion Tip: Talk about how we can bring positive messages or “good news” to others, just as these angels brought the good news about Yitzchak.
Dessert Idea #1: “Angel Cupcakes”
Angels are a central part of Parshas Vayeira, bringing Avraham and Sarah important messages. These “angel” cupcakes are a sweet reminder of their visit.
Ingredients: Cupcakes, white frosting, edible silver or gold stars.
Instructions:
Frost the cupcakes with white frosting.
Sprinkle edible silver or gold stars on top to symbolize the angels.
Parsha Connection: As your family enjoys these treats, discuss how the angels came to deliver important news to Avraham and Sarah, and how they brought blessings.
Dessert Idea #2: “Laughter Cookies”
The birth of Yitzchak (whose name means “he will laugh”) brings immense joy to Avraham and Sarah, symbolizing the unexpected blessings in life.
Bake simple sugar cookies and decorate with smiley faces or laughing expressions using icing.
Let kids add their favorite sprinkles to make it colorful and fun.
Parsha Connection: Talk about how Yitzchak’s birth was a miracle that brought laughter and joy to Avraham and Sarah, and how we can find joy in our own lives.
Recap of Key Parsha Themes
Kindness & Hospitality: Avraham’s open tent teaches us about welcoming guests and being kind to others.
Miracles & Faith: Sarah and Avraham’s faith is rewarded with the miracle of Yitzchak’s birth.
Bringing Good News: The angels are messengers of hope and blessing, reminding us to bring positive energy to those around us.
Parshas Lech Lecha tells the story of Avraham’s journey of faith and obedience to Hashem’s command to leave his homeland and go where He will show him. This pivotal moment in Jewish history offers an excellent opportunity to teach children about faith, adventure, and trust in Hashem’s plan. One fun and interactive way to engage young children with this story is through a sensory bin!
A sensory bin is a hands-on, interactive activity where children can explore different textures, materials, and objects while learning. In this post, I’ll share creative sensory bin ideas that will help bring Parshas Lech Lecha to life for your little ones.
Materials Needed for the Sensory Bin
To create a sensory bin that reflects the themes of Parshas Lech Lecha, gather the following materials:
Base material: Sand or dirt (to represent the wilderness and Avraham’s journey)
Figurines: Small toy figures of Avraham, Sarah, and other family members, camels (to represent the animals Avraham traveled with)
Stones or pebbles (symbolizing the journey and the different stops Avraham made)
Miniature trees or plants (optional, to represent the lands Avraham passed through)
Tray or shallow bin (to hold all the materials)
These simple items can be gathered from around your house or purchased from local stores, and they’ll provide an interactive experience that is the hallmark of sensory play.
Step-by-Step Instructions for Setting Up the Sensory Bin
Prepare the Base Start by filling your shallow bin or tray with sand or dirt to create the “wilderness” Avraham traveled through. This will serve as the base of the sensory bin, providing a realistic and textured environment for the children to explore.
Add Figurines Place small figurines of Avraham, his family, and toy camels around the bin to depict the characters on their journey.
Scatter Stones for the Journey Scatter small stones or pebbles throughout the sensory bin to symbolize the different stops Avraham made along his journey. You could even ask your child to help place the stones in the bin while talking about how Avraham journeyed to a new land.
Optional: Add Trees and Plants To further enhance the sensory experience, you can add small plastic trees or plants to represent the land Avraham passed through. This will add another layer of texture and color to the bin, helping children feel as if they are walking with Avraham.
Learning Opportunities & Activities
Once your sensory bin is set up, there are numerous ways for your child to engage with it, making it both educational and fun.
Storytelling: Encourage your child to retell the story of Parshas Lech Lecha using the figurines in the bin. Ask them questions like, “Where do you think Avraham is traveling next?” or “What does Avraham do when he comes to a new land?” This helps children connect with the Torah portion as well as practice storytelling.
Symbolism and Discussion: As your child plays with the sensory bin, take the opportunity to explain the symbolism behind different elements of the bin. For example, discuss how the stones represent the journey and how Avraham trusted God’s promise of a new land. Use simple language and ask your child how they think Avraham felt on his journey.
Interactive Play: You can create a “journey game” by asking your child to move Avraham and his family along the bin from one side to the other. Along the way, they can “stop” at the different stone markers and talk about the journey. This could turn into a fun, interactive learning experience that helps children understand the physical distance Avraham traveled.
Questions for Reflection: Ask questions that help children reflect on the themes of faith and trust from Parshas Lech Lecha. For example, “Why did Avraham trust in Hashem?” or “What does it mean to follow a new path, just like Avraham did?” This will help tie in the spiritual lessons of the Parsha.
Conclusion
Sensory bins are a wonderful way to bring the story of Parshas Lech Lecha to life for children. They offer a hands-on, immersive experience that fosters learning and creativity while reinforcing important lessons from the Torah. Whether your child is acting out Avraham’s journey, reflecting on the meaning of faith, or simply enjoying sensory play, this activity will engage them in meaningful ways.
I hope you’ll try this sensory bin idea with your little ones and create a fun and educational experience that connects them with the Torah in a hands-on way!
Hey, if you loved this sensory bin idea, be sure to subscribe to our newsletter for more Parsha-themed activities and fun learning ideas each week!
Parshas Lech Lecha tells the story of Avraham’s incredible journey, leaving his birthplace to follow Hashem’s command, exploring new lands, and embracing faith in the face of the unknown. These dessert ideas bring Avraham’s story to life, making it easier for kids to relate to his experiences through fun, symbolic treats. Let’s explore how each dessert connects with Avraham’s story in a meaningful way.
1. “Starry Sky” Chocolate Bark
Context: Hashem promises Avraham that his descendants will be as numerous as the stars in the sky. This promise reassures Avraham that his journey will lead to blessings and an abundant future, even though he doesn’t yet have any children.
Ingredients: Dark chocolate chips, edible star sprinkles, crushed pretzels.
Instructions:
Melt chocolate and spread it on parchment paper.
Sprinkle edible star sprinkles all over the chocolate, symbolizing Hashem’s promise to Avraham.
Add crushed pretzels for texture, representing the rocky desert terrain.
Chill in the fridge until firm, then break into pieces to serve.
Tip: Remind your family of Hashem’s promise to Avraham by counting the “stars” as you enjoy this bark, symbolizing a future full of blessing and abundance.
2. “Promised Land” Fruit Platter
Context: Avraham’s journey ultimately leads to the land of Canaan, the future home of his descendants, promised by Hashem. This land, described as a place of “milk and honey,” symbolizes abundance, growth, and the blessings of Hashem.
Ingredients: Grapes, dates, figs, and other fruits found in Israel; honey for dipping; fresh mint leaves for garnish.
Instructions:
Arrange a bountiful display of fruits on a platter to represent the promise of the land of Israel.
Place a bowl of honey in the center for dipping, symbolizing the sweetness of Hashem’s blessings.
Garnish with fresh mint leaves.
Tip: This healthy treat connects your family to the land promised to Avraham’s descendants. Use it as a moment to discuss Hashem’s blessings and promises in your own lives.
3. “Footsteps in the Sand” Sugar Cookies
Context: Avraham’s journey from Ur Kasdim to the land of Canaan is a journey of faith, with every step symbolizing trust in Hashem. His footsteps in the desert remind us that we often walk paths of faith, even when we don’t see what lies ahead.
Ingredients: Sugar cookie dough, footprint cookie cutter (or shape by hand), brown sugar or cinnamon sugar.
Instructions:
Roll out cookie dough and cut it into footprint shapes to represent Avraham’s footsteps.
Before baking, sprinkle a light layer of brown or cinnamon sugar to create a sandy look.
Bake as directed, let cool, and optionally add a glaze for sweetness.
Tip: As you enjoy these cookies, discuss how we follow in Avraham’s “footsteps” by trusting Hashem’s guidance, even when we don’t know where it will lead.
Final Thoughts:
These Parshas Lech Lecha-themed desserts are a wonderful way to bring the Torah portion to life through taste and storytelling. Each dessert is not only delicious but also a beautiful reminder of Avraham’s faith, kindness, and the promises of Hashem. Enjoy making these treats with your family as you savor the journey together!
Creating a minimalist laundry room can make a surprising difference! Imagine a clutter-free, organized space that actually feels calming. Here are some simple tips to help you get there.
1. Clutter Free Minimalist Laundry Room
Let’s start with the basics: get rid of anything that doesn’t belong. Old products, duplicate items, things you haven’t used in forever—say goodbye to it all. Keep only what you actually use for laundry day, and see how much space you free up.
2. Go for Neutral Colors
If you want that clean, fresh look, try neutral colors. Whites, soft grays, or pastel tones work wonders to open up the space. Plus, they’re timeless and give everything a light, airy feel—perfect for keeping things simple.
3. Use Smart Storage
A minimalist space is all about storage that works. Try stackable bins or sleek baskets that can hide away in cabinets or on shelves. If you have a smaller laundry room, look for slim storage options that keep things organized without taking up a lot of room.
4. Maximize Wall Space
Want more floor space? Use your walls! Hooks, shelves, and wall-mounted cabinets are lifesavers in a minimalist setup. You can even add a fold-down drying rack or a mounted ironing board for extra function without the bulk.
5. Stick to Essentials
Here’s a big one: only keep what you truly need. Instead of tons of products, go for a few good-quality, eco-friendly ones and store them in labeled containers. This way, you’ll always know what’s where, and there’s no extra clutter to manage.
With just these simple tweaks, you can turn your laundry room into a clean, functional space that makes life easier. Minimalism here isn’t just about looks; it’s about creating a space that’s totally practical—minus the mess!
Curtains transform a living room, and I learned this firsthand while updating mine! Here’s what I found helpful in choosing the perfect ones:
1. Match Your Style
When I started, I didn’t realize how much curtains could shape a room’s vibe. I wanted a relaxed, cozy feel, so I went with a linen blend that fit my room’s natural, warm tones. Think about your living room’s style and pick something that aligns:
Modern: Sleek, neutral fabrics like cotton work well.
Traditional: Rich, heavy velvet adds elegance.
Coastal: Light sheers can bring in a breezy, relaxed vibe.
2. Pick a Color
Choosing color was a big decision for me. My room has soft neutral tones, so I picked beige curtains to keep things light. Here’s what I learned:
Neutral Tones: White, beige, and gray are safe and make a room feel spacious.
Bold Colors: If you want a splash of energy, blues or mustard tones work well.
Patterns: I skipped patterns, but for a playful feel, stripes or florals can add personality.
3. Decide on Length
Length completely changes a room’s look. I chose floor-length, and it made my living room feel taller and more elegant.
Floor-Length: Adds drama and works for higher ceilings.
Sill-Length: Good for small windows or casual rooms.
Puddle Curtains: Creates a luxe feel—something I might try in another room!
4. Select Fabric
The fabric affects light and warmth. I loved the soft texture of linen, but here are other options:
Sheers: Perfect if you want natural light while maintaining privacy.
Cotton or Linen: Casual, versatile, and great for everyday rooms.
Velvet: Adds warmth, making it great for cozy spaces.
5. Consider Functionality
I went for layered curtains to adjust light based on the time of day, combining a sheer layer with heavier drapes.
Blackout Curtains: Ideal for blocking sunlight and adding privacy.
Sheers: Let in light without sacrificing privacy.
Layered Curtains: Perfect for flexibility—I can have full light or block it out entirely!
6. Choose Your Hardware
I learned that curtain rods and hardware matter more than I thought. I chose sleek black rods for contrast, but there are plenty of options depending on your room’s style.
Getting the right curtains helped me pull together my living room exactly how I wanted it to feel. The choices can be simple—pick a style, color, and length that matches your vibe, and enjoy the transformation!
Affiliate Disclosure: This list contains affiliate links. As an Amazon Associate, I earn from qualifying purchases at no additional cost to you. I only recommend products I genuinely love and think you’ll enjoy. Thank you for supporting my website!
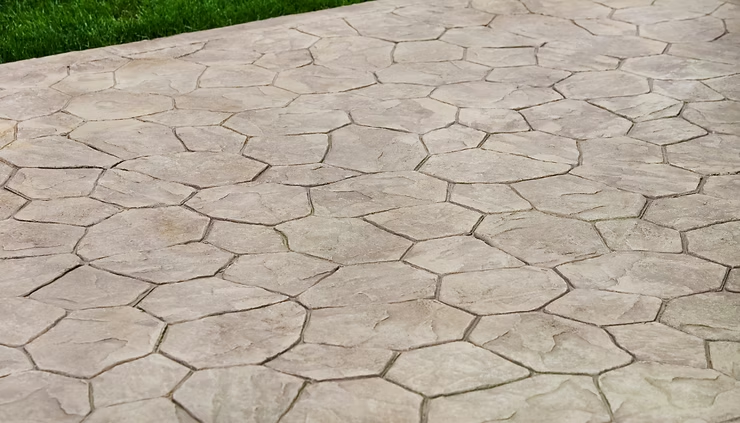
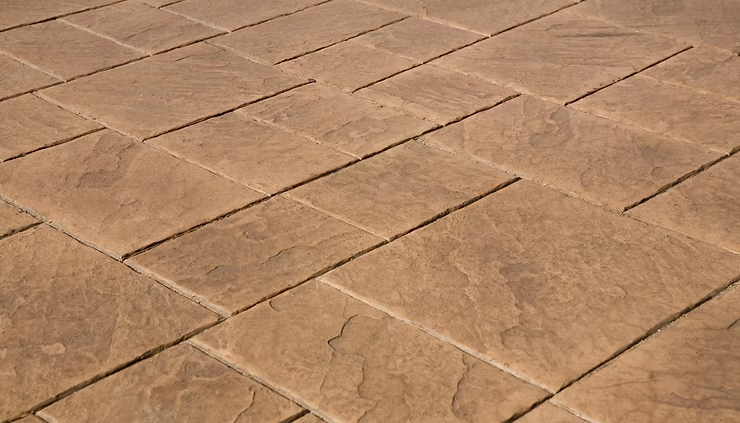
Have you been staring at your plain, gray concrete patio wondering how to give it a fresh, stylish makeover? Staining your concrete patio might be the perfect solution! It’s an easy, budget-friendly way to transform your outdoor space into something beautiful, without the need for a major renovation. Plus, the process is simple enough for even first-timers to tackle!
In this guide, I’m going to walk you through each step of the staining process so you can confidently upgrade your patio and make it the star of your backyard. Let’s get started!
Why Stain Your Concrete Patio?
So, why should you bother staining your concrete patio in the first place? Well, for starters, it’s one of the easiest ways to completely change the look of your outdoor space without spending a fortune. A simple coat of stain can take your patio from dull and gray to rich and vibrant in just a few hours. It’s like giving your concrete a makeover!
Not only does it look great, but stained concrete is also super durable. Unlike paint that can peel or chip, stains actually soak into the surface, making them resistant to fading and wear—perfect for patios that see a lot of foot traffic. Plus, concrete stains come in a wide variety of colors and finishes, so whether you’re into earthy tones or something a bit bolder, there’s something for everyone.
And the best part? It’s budget-friendly! You get a high-end look without the high-end price tag. Whether you’re going for that polished modern vibe or a more rustic, natural feel, staining gives you the flexibility to design your patio just the way you like it.
What You’ll Need to Stain Your Concrete Patio
Before we dive into the fun part—actually staining your patio—let’s talk about what you’ll need. Don’t worry, the materials and tools are pretty simple, and you might already have a few of these things lying around the house!
Materials:
Concrete Stain – There are two main types: acid-based or water-based. Both are great, but acid-based stains give a more natural, mottled look, while water-based stains tend to have brighter, more consistent colors. Pick whichever suits your style!
Concrete Cleaner – A good cleaner will help remove all the dirt and grime, so the stain goes on smoothly.
Paint Roller or Sprayer – Depending on your preference, you can roll the stain on or spray it for a more even finish.
Paint Tray – If you’re rolling it on, you’ll need one of these for your stain.
Painter’s Tape – To tape off areas you don’t want to stain (like walls or any nearby furniture).
Safety Gear – Gloves, a mask, and goggles to protect yourself while you work. You definitely don’t want to skip these!
Concrete Sealer – Optional, but highly recommended. It’ll protect your stain and keep your patio looking great for longer.
Tools:
Pressure Washer or Hose and Scrub Brush – A clean surface is key to getting that perfect stain, so you’ll want to either pressure wash the patio or scrub it down really well.
Plastic Sheeting – This will help protect any surrounding areas you don’t want to get stained.
Stiff-Bristle Brush – For scrubbing and cleaning before staining.
Gathering these materials before you start will save you a lot of headaches later. Once you’ve got everything together, you’re ready to start transforming your patio!
Preparing the Patio for Staining
Now that you’ve got all your materials ready, it’s time to get your patio prepped! This part might not be the most glamorous, but trust me, it’s crucial. A little bit of prep work will make all the difference in how the stain turns out. So, let’s roll up our sleeves and get started!
1. Clean the Surface
First things first—cleaning! You want your concrete to be as clean as possible so the stain can really soak in. If you’ve got a pressure washer, now’s the time to use it. If not, no worries, a good ol’ hose and a stiff-bristle brush will do the trick. Just make sure you scrub away all the dirt, oil stains, and any stubborn grime. This step might take a bit of elbow grease, but it’s totally worth it. The cleaner the surface, the better your stain will look!
2. Repair Cracks and Imperfections
Next up, check for any cracks or chips in the concrete. If you find some, you’ll want to patch them up before you stain. There are plenty of easy-to-use concrete patch kits out there. Just follow the instructions, and you’ll be good to go. Don’t skip this step! Staining over cracks can make them stand out even more, and we want your patio looking smooth and flawless.
3. Protect Surrounding Areas
Finally, let’s talk protection. You definitely don’t want stain splashing onto your house, plants, or furniture, right? Grab some painter’s tape and plastic sheeting to cover up anything that’s close to your patio. Tape off the edges where the concrete meets walls or steps, and drape plastic over anything else nearby. This will keep your stain right where you want it—on the patio!
Once you’ve tackled these prep steps, your patio will be all set for its big transformation. Time to get to the fun part—staining!
How to Stain Your Concrete Patio: Step-by-Step Instructions
Alright, the moment you’ve been waiting for—it’s time to stain that patio! Don’t worry, I’ve got you covered with a simple, step-by-step guide that’ll make the process smooth and easy. Let’s get to it!
1. Test the Stain
Before you go all-in, I recommend doing a quick test in a small, hidden area. This will help you make sure the color turns out exactly how you want it. Concrete can be a bit unpredictable, and you want to be sure you love the result before committing to the entire surface. Once you’re happy with the test spot, it’s time to move on!
2. Apply the Stain
Now for the fun part—applying the stain! Depending on the type of stain you chose, you’ll either be spraying or rolling it on.
If you’re using acid-based stain, grab a sprayer. This type of stain works best when it’s misted onto the surface, giving you that cool, variegated look.
If you’re using water-based stain, a paint roller is your best friend. Just dip it in the stain and roll it onto the patio in smooth, even strokes.
Whatever method you choose, take your time and be sure to apply the stain evenly. Work in sections, and don’t forget to overlap slightly so you don’t end up with any lines or uneven patches.
3. Work in Sections
Speaking of sections—this is a great tip to keep things looking neat! Divide your patio into manageable areas, and focus on one section at a time. It’s easier to keep track of where you’ve already stained, and it’ll give you more control over the final look. Whether you want a smooth, even finish or something a little more textured, working in smaller areas makes it easier to achieve.
4. Let the Stain Dry
Once the stain is applied, it’s time to let it dry and do its magic. Drying times can vary depending on the type of stain you used, but a good rule of thumb is to wait at least 24 hours before walking on it. If you can, give it a full 48 hours to really set. During this time, try to avoid any foot traffic, pets, or bad weather. You want your beautiful new stain to cure without any interruptions!
And that’s it! Your patio is well on its way to becoming the stunning outdoor space you’ve been dreaming of. Just one more optional step to go, and you’ll be all set!
Sealing the Stained Concrete (Optional but Recommended)
You’ve made it this far, and your patio is looking amazing! Now, there’s one last (optional) step that can really take your project to the next level—sealing the concrete. I know it might sound like an extra chore, but trust me, it’s worth it if you want to protect all your hard work and keep your patio looking fresh for years to come.
Why Seal?
So, why should you seal your concrete? Think of it like putting a topcoat on your nails or a protective case on your phone. A sealer acts as a shield, keeping your new stain vibrant and safe from the elements. It helps prevent fading, scratches, and wear—especially in high-traffic areas. Plus, it can enhance the color, making your patio pop even more!
How to Apply the Sealer
Ready to seal the deal? (See what I did there?) Applying the sealer is just as easy as staining. Here’s what you need to do:
First, make sure your stain is completely dry. You don’t want to trap any moisture underneath.
Grab a paint roller or a sprayer—just like you did with the stain—and apply a thin, even coat of sealer over the entire surface. Take your time and make sure to cover every inch.
Let the first coat dry, then decide if you want to add a second one for extra protection. Two coats usually do the trick for outdoor spaces.
Bonus Tip:
Some sealers come in different finishes, like matte or glossy, so you can choose the look that suits your style best. Want a subtle, natural finish? Go matte. Looking for a bit more shine? Glossy will give you that polished look.
Once your sealer is applied, let it dry completely—again, about 24 to 48 hours is ideal. After that, your patio will be ready to show off!
By adding a sealer, you’re not just finishing the job—you’re making sure your patio stays beautiful and protected for the long haul. And after all the effort you’ve put in, that’s a win in my book!
Maintaining Your Stained Concrete Patio
Your patio is now looking stunning—congrats on making it this far! To keep it looking this good year after year, a little bit of maintenance goes a long way. Don’t worry, though—taking care of your stained concrete is super easy, and with just a few simple tips, you can keep that fresh, vibrant look for the long haul.
Regular Cleaning
Just like any outdoor surface, your patio is going to collect dirt, dust, and the occasional leaf pile. A quick sweep every now and then will help keep things tidy, but every so often, it’s a good idea to give it a more thorough clean.
For regular maintenance, all you need is some mild soap and water. A mop or a gentle scrub brush will do the trick—no need for harsh chemicals!
If you do get a stubborn stain (we’re looking at you, barbecue spills), a concrete-safe cleaner will take care of it without damaging your beautiful stain.
Reapply Sealer
To keep your patio looking its best, you’ll want to reapply the sealer every few years. How often depends on how much wear and tear your patio sees—if it’s in a high-traffic area or gets hit with a lot of direct sunlight, you might want to reseal it a bit more frequently.
Don’t worry, resealing is a breeze. Just clean the surface, apply a fresh coat (or two), and you’re good to go!
A quick reseal every few years will keep the color vibrant and protect your patio from fading, weathering, or cracking.
Watch Out for Harsh Weather
If you live in an area with extreme weather, like freezing winters or blazing hot summers, you might want to be a little extra mindful. Extreme conditions can take a toll on concrete over time, so resealing more often or using protective coverings during off-seasons can help extend the life of your stain.
That’s it! Maintaining your stained concrete patio is low-key, but these small efforts will keep it looking brand new for years to come. Now sit back, relax, and enjoy your upgraded outdoor space!
And there you have it! You’ve successfully learned how to stain your concrete patio, transforming it into a stunning outdoor space that you can be proud of. With just a few simple steps, you’ve given your patio a fresh new look that’s both beautiful and durable.
Remember, the key to a successful staining project is in the prep work and maintenance. With a little care, your patio will stay vibrant and inviting for years to come. Don’t be afraid to add your personal touch with furniture, plants, or decor that reflects your style. After all, this is your space to enjoy!
I’d love to hear about your staining adventures! Have you tried staining your patio yet? Or do you have any tips or tricks to share? Feel free to drop a comment below—let’s chat! Happy staining, and here’s to many wonderful moments spent on your lovely new patio!
Let’s be honest: laundry isn’t most people’s favorite task. I know it isn’t mine. But what if your laundry room could become a space that sparks joy instead of dread? With a few thoughtful decor choices, you can transform your laundry room into a bright, organized, and stylish haven! Below are some of my favorite decor ideas that not only add charm but also serve a functional purpose. Plus, I’ve linked a few products that can help you bring these ideas to life. (Note: some of these links are affiliate links, which means I may earn a small commission if you make a purchase—at no extra cost to you!)
1. Vintage-Style Baskets
If you’re anything like me, you love a good basket! Not only do they look great, but they’re perfect for storing laundry essentials like dryer sheets or stain removers. Opt for woven or wire baskets with a vintage look—they’ll add a touch of charm to your space while keeping things tidy.
Keeping track of your laundry supplies has never been easier! Chalkboard labels add a rustic feel while ensuring you know where everything is. Label jars for detergent, softeners, and even the laundry pods you use regularly. This little touch can go a long way in making your laundry routine smoother!
Check out a set of stylish chalkboard labels here.
3. Wall Art That Speaks to You
Wall art in a laundry room? Yes, please! It’s a great way to add personality. Think framed quotes like “Laundry Today or Naked Tomorrow” or calming nature scenes to help brighten your mood. Choose pieces that reflect your personality and make the room feel less utilitarian.
Find fun and inspiring laundry room wall art here.
4. Floating Shelves for Style and Function
Who doesn’t need extra storage in the laundry room? Floating shelves give you that storage while keeping things light and airy. You can use them for everything from cute storage bins to displaying a potted plant or two.
Your laundry hamper doesn’t have to be dull. Pick one that blends with your decor—whether it’s a neutral canvas, woven rattan, or a fun pop of color. A good-looking hamper can be both functional and a part of your design.
Decorating your laundry room doesn’t have to be complicated. With a few strategic decor pieces, you can turn this often overlooked space into a place that’s a joy to spend time in! What’s your favorite laundry room decor idea? Let me know in the comments below!
When it comes to upgrading your bedroom, choosing the right bed frame style is key. With so many different bed frame styles available, it can be hard to know where to start. In this blog post, I’ll help you navigate the most popular bed frame designs so you can find the perfect one for you.
Top 6 Different Bed Frame Styles You Should Know About
1. Platform Bed Frames
Platform beds are very simplistic. They sit lower to the ground, which gives a modern, minimalist look. Plus, you don’t need a box spring—just your mattress. They’re perfect for small rooms when you need to save space.
2. Panel Bed Frames
Panel bed frames are a very classic choice. With a tall headboard and sometimes a footboard, they give your room a solid, structured look. They work well in traditional or elegant bedroom setups.
3. Sleigh Bed Frames
Want something a bit fancy? Sleigh beds, with their curvy headboards and footboards, bring a touch of luxury. They’re great if you want your bed to be the focal piont of the room.
4. Storage Bed Frames
Need more storage? Go for a bed frame with built-in drawers or under-bed storage. These frames are very practical for small bedrooms or rooms without enough closet space.
5. Canopy Bed Frames
Canopy beds are tall and striking, often with four posts that can support drapes. They add a royal, dramatic, feel to any bedroom.
6. Adjustable Bed Frames
This one is for the techies. These frames allow you to adjust your mattress position for extra comfort. A fabulous choice for anyone who spends a lot of time reading or watching TV in bed.
FAQs About Bed Frame Styles
What are the different types of bed frames?
There are several types of bed frames, including platform, sleigh, canopy, storage, and adjustable bed frames. Each offers unique benefits depending on your room size and décor.
Which bed frame is best for small rooms?
Platform bed frames and storage bed frames are perfect for small rooms since they offer a minimalist design and built-in storage options.
Can an adjustable bed frame fit with any mattress?
Most modern mattresses are compatible with adjustable frames, but check your mattress specs just in case.
Your bed frame definitely sets the tone for your bedroom’s look and feel. Whether you want something simple or something grand, there’s a perfect style out there for you. Take into account your room
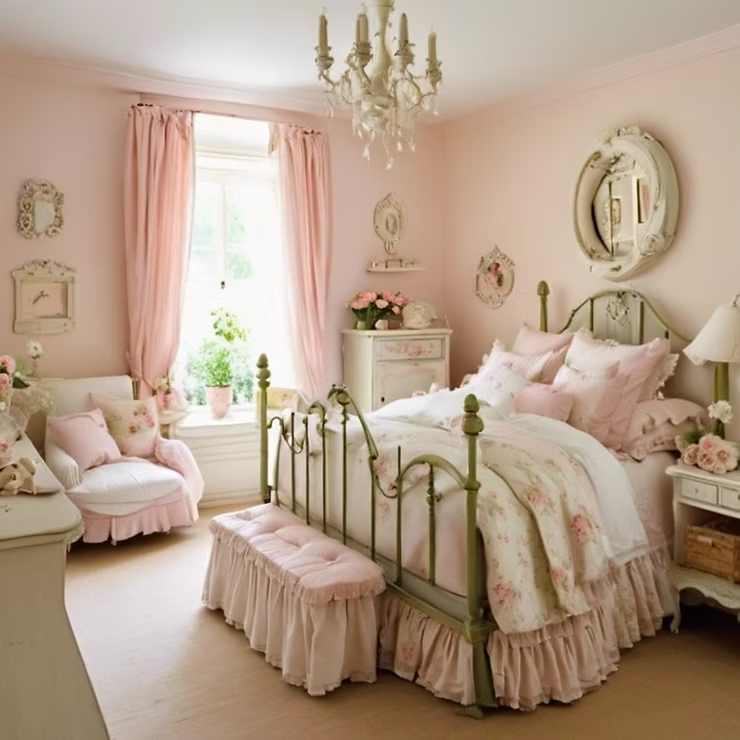
Creating an inviting vibe in your bedroom is essential for relaxation. Shabby chic bedroom decor offers a blend of vintage aesthetics and modern functionality. This style combines soft colors, floral patterns, and rustic elements, making it a perfect choice for those who love a cozy, romantic vibe.
How do I make my bedroom shabby chic?
When it comes to shabby chic bedroom decorating, the key is to blend elegance with a touch of rustic charm. Here are some tips to help you achieve the perfect shabby chic look:
1. What colors are considered shabby chic?
Go with a color palette that includes pastels like pale pink, mint green, and light blue. Consider painting your walls in a soft cream or light gray to enhance the warm feeling.
2. Incorporate Vintage Furniture
Vintage furniture pieces can elevate your bedroom decor. Look for antique dressers, bedside tables, and armoires that add character to your space. Distressed finishes hallmarks of this style, so don’t shy away from imperfections.
3. Using Floral Patterns in Shabby Chic Bedroom Decor
Floral patterns are a staple of shabbyand chic. Incorporate floral prints in your bedding, curtains, and pillows. This will add a cheerful touch to your bedroom.
4. Layer Textures
Layering textures is epic in shabby chic decorating. Mix and match fabrics like linen, lace, and cotton to create a cozy vibe. Use different textures in your bedding, throw blankets, and area rugs to add depth and interest.
5. Add Personal Touches
Personalize your space with decor items that reflect your style. Incorporate vintage mirrors, framed photos, and handcrafted pieces. These personal touches will make your bedroom feel warm and inviting.
6. Don’t Forget Lighting
Lighting plays a large role in creating the perfect ambiance. Opt for soft lighting options, like table lamps with fabric shades or string lights, to enhance the feel of your bedroom.
How can I make my bedroom look chic?
To help you get started on your shabby chic bedroom decorating journey, here are some affiliate links to products that can elevate your space:
Charming Wall Art: Incorporate vintage-inspired wall art to enhance your decor. Explore CollectionBy incorporating these tips and products, you can transform your bedroom to reflect your unique style. Start your shabby chic bedroom decorating today and enjoy the charm it brings to your space.