Author: thehomemakersdream@gmail.com

  • How to Organize Your Kitchen Pantry: Simple and Stylish Ideas for Everyone

    Organized pantry with white shelves, jars of grains, spices, and cooking utensils. Minimalist design, neutral colors, tidy arrangement.

    Feeling overwhelmed by your cluttered kitchen pantry? You’re not alone! In this guide, we’ll show you how to organise your kitchen pantry in no time. Whether you live in a cozy apartment or a spacious home, these pantry organization ideas for small spaces will help you reclaim your pantry. Let’s dive into how to organise your kitchen pantry simple and stylish. These are organizing the pantry tips that are straightforward and effective!

    Step 1: Clear It Out

    First things first: empty your pantry! Take everything out and sort through your items. Toss any expired products or items you know you won’t use. This step is crucial in organising your pantry and gives you a clean slate to work with.

    Step 2: Categorize Your Goods

    Once your pantry is empty, group similar items together. Here’s a quick way to categorize:

    • Canned Goods: Soups, vegetables, fruits
    • Baking Supplies: Flour, sugar, spices
    • Snacks: Chips, nuts, dried fruits
    • Cooking Essentials: Oils, vinegars, sauces

    This simple organization will make it much easier to find what you need while cooking.

    Step 3: Choose the Right Containers

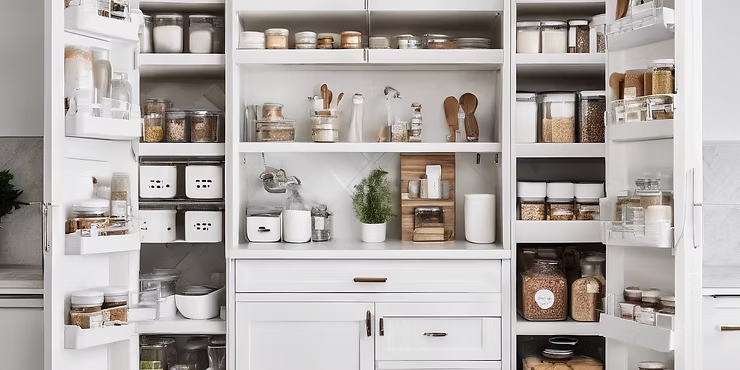
    Investing in clear containers can completely transform your pantry. Use labeled jars for grains, pasta, and snacks to keep everything fresh and visible. Here are some tips on organizing the pantry effectively:

    • Use Air-tight Containers: Keep food fresh and pest-free.
    • Choose Stackable Bins: These maximize vertical space, especially if you have limited room.

    Step 4: Pantry Organization Ideas for Small Spaces

    Living in a small space doesn’t mean you can’t have an organized pantry! Here are some clever pantry space ideas:

    • Use Door Space: Install hooks or a small rack on the inside of your pantry door to hold spices or cutting boards.
    • Vertical Storage: Opt for tall shelving units or stackable bins to utilize every inch of space. If you have a deeper pantry, consider pull-out drawers to make items in the back more accessible.
    • Tiered Racks: These are great for canned goods or small bottles, allowing you to see everything at a glance.

    Step 5: Organize and Style Your Pantry

    Let’s face it—an organized pantry can also be beautiful! Here are a few tips to organize and style:

    • Color Code: Arrange your jars and containers by color for a visually appealing look.
    • Labels: Not only do they help with organization, but they can also add a decorative touch. You can use chalkboard labels, printed labels, or even DIY options.
    • Incorporate Decor: Add some greenery with small plants or decorative bowls for an extra pop of style.

    Step 6: Maintain Your Organized Pantry

    The key to a long-lasting organized pantry is regular maintenance. Make it a habit to:

    • Reassess Every Few Months: Check for expired items and reorganize as needed.
    • Keep It Clean: Wipe down shelves and containers regularly to maintain a fresh look.

    Now that you have all these tips on how to organise your kitchen pantry, it’s time to get started! Whether you’re working with a large or small space, implementing these pantry organization ideas for small spaces will help you create a functional and stylish pantry.

    Remember, the goal is to make cooking enjoyable and hassle-free! So roll up your sleeves, and let’s transform that pantry into a beautiful and organized space. Happy organizing!

    Have you tried any of these tips? Share your own organizing the pantry success stories in the comments below, and don’t forget to subscribe for more practical tips and ideas!

  • How to Set up the Perfect Playroom for Your Kids: Top Ideas and Product Recommendations

    Designing a playroom is one of the best ways to create a fun and organized space for your children. Whether you have a small corner or a whole room to dedicate to playtime, the right setup can help boost creativity, encourage independent play, and keep your home clutter-free. In this guide, we’ll walk you through how to set up the perfect playroom and recommend some must-have products to make it easier.

    Children play with toys and an abacus in a classroom. Colorful posters on the wall. Playful and cheerful atmosphere.

    Why a Playroom Is Essential for Every Family Home

    A playroom serves as a space where kids can learn, play, and develop important skills. Here are just a few reasons why creating a playroom is a smart decision for every homemaker:

    • Organization: A designated play area keeps toys and games in one place, making clean-up easier.
    • Encourages Independence: A well-designed playroom allows children to explore and use their imagination without constant supervision.
    • Promotes Creativity and Learning: Stock your playroom with educational toys, art supplies, and books to create a fun learning environment.

    Steps to Set up the Perfect Playroom

    1. Choose the Right SpaceYou don’t need an entire room to create a play area. A corner of the living room, basement, or even a large closet can work. Consider natural light, easy access, and the ability to supervise while kids play.
    2. Divide the Space into ZonesA great playroom has multiple zones for different activities. You can create separate spaces for:
      • Art and Crafts: Set up a small table and chair set along with storage for art supplies.
      • Active Play: A small indoor slide, play tent, or soft mats can encourage physical play.
      • Reading Nook: A cozy area with bookshelves and comfy seating.
      • Toy Storage: Use bins, baskets, and cubbies to keep toys organized and easily accessible.
    3. Make It Kid-FriendlyWhen choosing furniture, opt for low shelves and storage solutions that your child can easily reach. Use soft rugs and cushions for comfort and safety. Add bright colors and whimsical decor to make the space inviting and fun.
    4. Safety FirstBe sure to childproof the room by securing heavy furniture to the wall, covering electrical outlets, and keeping choking hazards out of reach. You want your kids to have fun but be safe while doing it!

    Top Products to Make Your Playroom Functional and Fun

    Here are some must-have products to help you set up an amazing playroom. These are all affiliate links, so if you purchase through these, you’ll be supporting our blog at no extra cost to you!

    1. Toy Storage Solutions

    2. Kids’ Play Furniture

    3. Active Play Equipment

    4. Reading and Quiet Time

    Tips for Keeping the Playroom Organized

    • Rotate Toys: Keep a few toys out at a time and rotate them every few weeks to keep things fresh and exciting.
    • Label Bins and Shelves: Use picture or word labels so that even younger kids know where things go.
    • Clean-Up Routine: Make clean-up time part of the day by teaching kids to put their toys away after playtime.

    In Conclusion,

    Creating a playroom that is both functional and fun doesn’t have to be difficult. With the right setup and a few key products, you can transform any space into a magical play area that your kids will love. Don’t forget to check out our recommended products to make your playroom a hit! Happy decorating!

    **Some of the links in this post are affiliate links. This means that, at no additional cost to you, I may earn a commission if you click through and make a purchase. I only recommend products that I personally use or believe will add value to my readers. Your support helps keep this blog running, and I truly appreciate it!

  • Best Bedding Sets for Ultimate Comfort: High-Quality Bed Linens, Comforters, and Pillows

    There’s nothing quite like the feeling of slipping into a cozy, comfortable bed at the end of a long day. As homemakers, we all know how much better we sleep when our bedding is soft, luxurious, and well-suited to our needs. Whether you’re looking to upgrade your master bedroom or refresh a guest room, investing in high-quality bedding can make all the difference.

    In this post, I’ll be sharing the best bedding sets for ultimate commfort to create that ultimate comfort experience, with recommendations for luxurious bed linens, plush comforters, and supportive pillows that will transform your bedroom into a restful haven.

    Modern bedroom with beige bed, teal throw, and wood accents. Sunlit curtains, white cabinets, and wooden floor create a serene ambiance.

    1. Luxurious Bed Linens: Soft and Breathable for a Better Night’s Sleep

    When it comes to bedding, your sheets are the foundation. Choosing the right bed linens can make your bed feel like a 5-star hotel. If you’re tired of scratchy, stiff sheets, it’s time to upgrade to high-quality cotton or bamboo sheets that offer both softness and breathability.

    What to Look For in Bed Linens:

    • Thread Count: A higher thread count typically means softer sheets. Aim for a minimum of 300 to 500 thread count for a smooth feel.
    • Material: Opt for 100% cotton, Egyptian cotton, or bamboo for ultimate softness and durability. These materials are also naturally breathable, keeping you cool during hot nights.
    • Weave: Consider percale for a crisp, lightweight feel, or sateen for a silky, more luxurious touch.

    ➡️ Top Picks for Bed Linens:

    2. Plush Comforters: The Perfect Balance of Warmth and Softness

    A good comforter is more than just a blanket – it’s what envelops you in warmth and comfort. Whether you prefer lightweight options for warmer climates or thick, fluffy comforters to keep you warm during winter, the right choice can dramatically improve your sleep quality.

    What to Look For in a Comforter:

    • Fill Material: Down comforters offer warmth and softness, while down alternatives are perfect for those with allergies. Both options provide plush comfort without the heaviness.
    • Fill Power: The higher the fill power, the fluffier and warmer the comforter. Look for 600+ fill power for a luxurious feel.
    • Weight: Choose a lightweight comforter for summer and a medium to heavyweight one for cooler months.

    ➡️ Top Picks for Comforters:

    3. Supportive Pillows: Cradle Your Head in Comfort

    No bedding set is complete without the right pillows. Whether you’re a side, back, or stomach sleeper, having the right amount of support is key to waking up feeling refreshed and pain-free. Supportive pillows keep your neck aligned, reduce tension, and can even help with sleep quality.

    What to Look For in Pillows:

    • Fill Type: Memory foam, down, and down alternatives are popular choices. Memory foam pillows provide excellent support for back and side sleepers, while down offers a softer, more malleable feel.
    • Firmness: Side sleepers typically need firmer pillows, while back sleepers may prefer medium firmness. Stomach sleepers usually benefit from a softer pillow to prevent neck strain.
    • Cooling Properties: If you tend to overheat, look for pillows with cooling gel or breathable fabrics.

    ➡️ Top Picks for Pillows:

    4. Best Bedding Sets for Ultimate Comfort

    If you want to make upgrading your bedroom easier, consider purchasing a complete bedding set. These sets often include bed linens, a comforter, and pillow shams, ensuring your entire bed is coordinated and cozy. Not only do they save time, but they can also be more affordable than buying each piece individually.

    ➡️ Top Picks for Bedding Sets:

    Benefits of Investing in High-Quality Bedding

    Investing in high-quality bedding isn’t just about luxury; it’s about improving your sleep quality and making your bedroom a sanctuary of relaxation. Here are a few reasons why upgrading your bedding is worth it:

    • Better Sleep Quality: Soft, breathable fabrics help regulate temperature and keep you comfortable all night.
    • Durability: High-quality bedding lasts longer and maintains its softness, wash after wash.
    • Enhanced Comfort: The right combination of sheets, comforters, and pillows makes your bed more inviting and cozy.
    • Style Upgrade: A coordinated bedding set instantly elevates the aesthetic of your room, making it look polished and inviting.

    Create Your Dream Bed Today

    Creating the ultimate sleeping environment doesn’t have to be complicated or expensive. With the right bed linens, comforters, and pillows, you can transform your bed into a haven of comfort that you look forward to every night.

    Ready to make the change? Explore these top picks and start building the bed of your dreams today!

    Note: Some of the links in this post are affiliate links, which means I may earn a small commission if you make a purchase at no additional cost to you. Thank you for supporting quality content and comfort!

  • Eco-Friendly Bathroom Upgrades: Sustainable Toiletries for a Greener Home

    As homemakers, we often find ourselves looking for small but impactful ways to reduce waste and make our homes more sustainable. One of the easiest places to start is right in the bathroom. Every day, we use toiletries that often come in single-use plastics and are harsh on the environment. But what if we could make eco-friendly bathroom upgrades that are just as effective and feel great to use?

    Let’s dive into a few simple, sustainable bathroom upgrades that can make a big difference—not only for the environment but for the overall vibe of your home.

    Modern bathroom with a sleek white tub, wooden floor, and large windows. A potted plant adds greenery. Bright, airy ambiance.

    1. Bamboo Toothbrushes: Small Swap, Big Impact

    If you’re like me, you probably never gave much thought to your toothbrush, right? But did you know that over a billion plastic toothbrushes end up in landfills each year? That’s a staggering amount of waste for something we replace every few months.

    Switching to a bamboo toothbrush is a super easy way to cut down on plastic waste. These eco-friendly toiletries are biodegradable, feel just as comfortable in your hand, and even look more stylish sitting on your sink. You can usually find them in recyclable packaging too—win-win!

    ➡️ My Favorite Picks:

    2. Refillable Shampoo Bottles: Clean Hair, Clean Conscience

    Another common source of bathroom waste is all those plastic shampoo and conditioner bottles. Most of us are used to buying new bottles every few months, but what if you didn’t have to? Refillable shampoo bottles offer a sustainable solution, reducing bathroom waste while using eco-friendly products.

    Here’s the trick: instead of buying new plastic bottles each time, you can purchase shampoo and conditioner in bulk or use refill stations (many local stores offer these now!). Not only do you cut down on plastic, but you can also choose high-quality, sulfate-free, or even organic products that are better for your hair and the planet.

    ➡️ Eco-Friendly Shampoo Bottles I Love:

    3. Sustainable Skincare: Treat Your Skin and the Earth Right

    The skincare aisle can be overwhelming—there are so many products, and let’s be honest, many come with excessive packaging. One way to go greener and have a zero-waste bathroom, is by choosing brands that focus on minimal or eco-friendly packaging, such as glass jars or compostable materials, and use natural, eco-friendly ingredients.

    Some brands even offer a refill service where you send back your empty containers to be refilled and reused. Not only are you reducing waste, but you’re also treating your skin to clean, non-toxic ingredients. Your skin deserves the best, and so does the planet!

    ➡️ My Go-To Sustainable Skincare Products:

    4. Say Goodbye to Disposable Razors

    If you’ve been using disposable razors, it’s time for an upgrade! A great eco-friendly bathroom upgrade is a stainless steel safety razor, which uses a single blade and can last for years. Unlike their plastic counterparts, safety razors are often made from durable materials like stainless steel, and the only part you need to replace is the blade. This swap not only helps you reduce waste but also gives you a closer, smoother shave.

    ➡️ Top Eco-Friendly Razors:

    5. Compostable Dental Floss: Yes, It’s a Thing!

    Let’s not forget about dental floss, another bathroom item often made of plastic. Many brands now offer compostable dental floss, which is made from natural fibers like silk or corn-based materials. Even better, these flosses often come in reusable glass containers, so you can refill them over and over again and reduce bathroom waste.

    ➡️ Compostable Dental Floss Options:

    Small Steps, Big Changes with Eco-Friendly Bathroom Upgrades

    Making your bathroom more eco-friendly doesn’t have to be complicated or overwhelming. By swapping out a few everyday items for zero-waste alternatives, you can reduce bathroom waste, feel good about your impact, and even enjoy some beautiful new products that make your bathroom look and feel more luxurious.

    The great thing about these changes is they don’t just benefit the environment—they make your daily routines a little more special. From the sleek feel of a bamboo toothbrush to the soft lather of an organic shampoo, these products are all about caring for yourself and the world around you.

    Ready to make the switch to a sustainable home? Start small, and before you know it, your eco-friendly bathroom upgrades will create an eco-friendly haven!

    **this post contains affiliate links at no extra cost to you.

  • Which wall art is good for living room?

    When it comes to room decor the right wall art can really inject the wow factor in a room. When I went through the process of finding the perfect wall art for my home, I realized that there is so much nuance to this dicision. It’s not just about which art matches your couch, or what looks pretty at first glance. So, if you’re wondering what type of wall art works best for a living room, here’s what I learned (and maybe it’ll help inspire you too).

    Chic living room with beige sofa, gray pillows, art frames on pale blue wall, wicker chair, wooden tables, soft lighting, cozy vibe.

    1. The Power of a Statement Piece

    The first thing I realized is that having one large, bold piece can act as the focal point of the room. I was initially hesitant to go big—what if it overwhelms the space? But once I found a large abstract painting with earthy tones, it instantly became the star of the room. It doesn’t have to be abstract art; you can go for landscapes, photography, or even a modern twist on a classic painting.

    My advice? Trust your gut and go for something you love. You’ll know it’s the right one because it’ll feel like it brings the room to life!

    2. Gallery Walls for the Win

    If one big piece isn’t your thing, or you just love a mix of visuals, creating a gallery wall is a fantastic option. I’ve always admired those Pinterest-perfect gallery walls, so I decided to give it a try. You can mix and match smaller frames with different types of art: photos, quotes, illustrations, or even personal memorabilia like postcards from your travels.

    One tip I found handy is to lay everything out on the floor first to get a sense of spacing. You may even end up with a gallery wall that tells a bit of your personal story, from an old family photo to a map of your favorite hiking spot.

    3. Textures and 3D Art

    Here’s where things get a little unexpected: not all art has to be flat. Incorporating textiles, sculptures, or even a decorative mirror can add dimension to your wall. I’ve come across a woven wall hanging in neutral tones that can add some coziness and texture to my space. It could give the room a softer, more welcoming feel.

    If your living room is lacking texture, a textile piece like a macrame or fiber art might be what you need.

    4. Complementing Your Style

    The key to choosing wall art is making sure it fits with the overall vibe of your living room. So, if your space has a bit of a boho-chic feel, earthy colors, natural materials, and a relaxed style of art work well. But if you have a more minimalist or modern aesthetic, you might prefer something with clean lines and minimal color.

    It’s all about what makes your heart sing. Don’t feel pressured to follow trends if they don’t resonate with you.

    5. Personal Touches

    Lastly, don’t forget about personalizing your space. One of my favorite additions is a framed print of a quote that’s meaningful to me. It adds a touch of personality and uniqueness to the room, reminding me that this is my space. Whether it’s family photos, a piece of art you created yourself, or something that holds sentimental value, adding something personal makes your living room feel truly yours.

    Yellow armchair and lamp in modern living room. Abstract art on wall, vase with flowers on table, wooden floor, cozy and stylish.

    Final Thoughts

    When it comes to choosing which wall art is good for your living room, can be a little daunting, but it’s also such a fun way to express yourself. The living room is a place where you relax, entertain, and spend time with loved ones, so the art should reflect that vibe. Whether you go for a single bold piece, create a gallery wall, or mix in textures, there’s no right or wrong way—just what feels right for you.

    Have fun with it, and don’t be afraid to experiment! After all, art is all about expression.

  • How to Make the Perfect Iced Coffee at Home

    There’s nothing quite like a refreshing iced coffee, especially on a warm day. Whether you’re looking to save money, skip the long lines at the coffee shop, or simply enjoy a customized drink at home, learning how to make iced coffee is a game-changer. Here’s a step-by-step guide to creating the perfect iced coffee in your own kitchen.

    Glass of iced coffee with milk swirls on a napkin-covered tray, coffee pot blurred in background. Bright, inviting mood.

    Ingredients You’ll Need:

    • Freshly brewed coffee (about 1 cup)

    • Ice cubes

    • Milk or cream (optional)

    • Sweetener (sugar, honey, or flavored syrup)

    • Flavoring (like vanilla extract, cocoa powder, or cinnamon)

    Step-by-Step Guide:

    1. Brew Your Coffee

    Start with your favorite coffee beans and brew a strong cup of coffee. You can use a drip coffee maker, French press, or pour-over method—whatever you prefer. For a bold iced coffee, use slightly more coffee grounds than you would for hot coffee.

    2. Cool It Down

    Once brewed, let the coffee cool down to room temperature. For faster cooling, you can place it in the fridge for about 15-20 minutes. Avoid pouring hot coffee directly over ice, as it can dilute your drink.

    3. Sweeten It Up (Optional)

    Add your sweetener of choice while the coffee is still warm, as it will dissolve better. Stir well. If you prefer unsweetened coffee, you can skip this step.

    4. Prepare Your Glass

    Fill a glass with ice cubes. For an extra twist, you can freeze coffee cubes instead of regular ice to avoid watering down your drink.

    5. Pour and Customize

    Pour the cooled coffee over the ice. Add milk, cream, or any plant-based alternatives like almond, oat, or soy milk. Stir well to combine.

    6. Add Flavor (Optional)

    Enhance your iced coffee by adding a splash of vanilla extract, a sprinkle of cocoa powder, or even a dash of cinnamon. Mix well to blend the flavors.

    7. Serve and Enjoy!

    Grab a straw, give your drink a final stir, and enjoy your homemade iced coffee!

    Bonus Tips:

    • Cold Brew Option: For a smoother, less acidic taste, try making cold brew by steeping coarse coffee grounds in cold water for 12-24 hours, then strain and serve over ice.

    • Espresso Iced Coffee: Use a shot or two of espresso instead of regular coffee for a more intense flavor.

    • Make It Fancy: Top your iced coffee with whipped cream, chocolate shavings, or a drizzle of caramel for an extra indulgence.

    Making iced coffee at home is easy, customizable, and satisfying. With just a few ingredients and a little prep, you can enjoy a café-quality drink any time of the day. Experiment with different flavors, sweeteners, and add-ins to find your perfect iced coffee recipe.

    Grab your glass, get creative, and enjoy the refreshing taste of homemade iced co

  • Top 10 kitchen faucets on Amazon

    The currated collection of the top 10 kitchen faucets on Amazon

    May contain Affiliate links

    Gold kitchen faucet over a black sink, white subway tile backsplash, wooden cutting board with a pear, and sunlit windows in the background.

    I like the ease of installation, water pressure, and quality of this faucet. It looks good, has a beautiful brushed brass finish. It’s a high end product and totally worth the money.

    Shop this faucet

    Sleek stainless steel kitchen faucet with a high arc and pull-down spray head. Minimalist lever handle. Set against a white background.

    This bestselling faucet is beautiful and really easy to install.

    A girl rinses a tomato under a black kitchen faucet. Bright kitchen with white cabinets. APPASO logo in the corner. Fresh veggies nearby.

    This faucet is a statement piece!

    Gold kitchen faucet with a high arc and pull-down spray head, featuring a single lever handle on a matching base. Simple background.

    This modern brass copper faucet has a pull down sprayer to make your life easier.

    Matte black kitchen faucet with pull-down sprayer over a sink, set against a white tiled wall. Tomatoes are on a cutting board nearby.

    I like the appearance, value, and performance of this faucet.

    Stainless steel kitchen faucet with a high arc design and pull-down sprayer. Brand logo "APPASO" on handle. White background.

    According to happy customers, this faucet is worth double its price!

    Black Delta faucet with a sleek, modern design against a white background. No visible water flow or additional objects. Minimalist aesthetic.

    Check out this ‘touch anywhere‘ black matte faucet.

    A hand activates a touchless brass kitchen faucet with running water over a marble countertop. Blue sensor waves are visible.

    Using motion-sensor technology to detect the presence of hands, this faucet allows you to turn water ON and OFF without touching the handle or spout. Built-in timer automatically stops the flow of water after 3 minutes to help prevent water waste.

    Black matte kitchen faucet with a high arc and lever handle, paired with a matching soap dispenser. Text reads "APPASO" on the base.

    This pretty faucet is easy to install and comes with a soap dispenser.

    A woman and girl wash vegetables in a bright kitchen with a sleek black 360° faucet. Green plants visible through the window.

    This modern faucet that rotates 360 degrees and looks very dainty in any kitchen

  • Aesthetic Vanity Accessories

    Welcome to my series of ‘creating aesthetic spaces – without breaking the bank.’ Here are my top picks for clean and neutral, yet sharp looking and aesthetic vanity accessories.

    Vanity accessories collage: mirror, white bubble candles, reed diffuser, potted plant, jars with wooden lids, soap dispensers. Text: Amazon Finds.

    *this blog contains affiliate links

    a. Mirrors make any space look bigger. I especially like the sharp black frame on this one.

    b. There’s something about pretty candles. They are something small that will make a big difference.

    c. This diffuser is an all time favorite. I may or may not have a few of them throughout my home 😉

    d. What could be a better way to add a pop of color to this space, than some faux greenery. I particularly love how this plant ties all the colors of this pallete together.

    e. If you will have toiletries displayed, you might as well do so in a pretty way.

    f. These soap dispensers will add the perfect charm to your space.

  • Design a Room – Clean Aesthetic

    Step in to cozy. Make your space unique. Check out these clean aesthetic decor pieces.

    *this post contains affiliate links

    Wavy mirror, cozy beige couch with a textured white blanket, four botanical prints on wall, soft and calming atmosphere.

    shop 63″ x 24″ wavy mirror

    shop soft and cozy fleece blanket

    shop minimalist floral artwork

  • Leather Napkin Wraps for Your Rosh Hashana Meals

    Elegant table setting with a white napkin in a gold ring on a plate, ornate lace mat underneath, and Hebrew text on a menu card.

    BUY NOW

    These gorgeous, classy Leather Napkin Wraps are a must-have at your Rosh Hashana meals tablescape! Use it to wrap your cutlery or napkins. Set by each seat to upgrade your table! So easy to style. So easy to clean. 

    • Set of 4
    • Packaged in a Suede Waterdale Pouch, gift ready
    • Dimensions: 6.12″ x 1.5″